Tuesday, 14 October 2014

Basic PC shortcut keys

Below is a list of some of the most commonly used basic shortcut keys that will work with almost all IBM compatible computers and software programs. It is highly recommended that all users keep a good reference of these shortcut keys or try to memorize them. Doing so will dramatically increase your productivity.
Shortcut Keys Description
Alt + F File menu options in current program.
Alt + E Edit options in current program
Alt + Tab Switch between open programs
F1 Universal Help in almost every Windows program.
F2 Rename a selected file
F5 Refresh the current program window
Ctrl + N Create a new, blank document in some software programs
Ctrl + O Open a file in current software program
Ctrl + A Select all text.
Ctrl + B Change selected text to be Bold
Ctrl + I Change selected text to be in Italics
Ctrl + U Change selected text to be Underlined
Ctrl + F Open find window for current document or window.
Ctrl + S Save current document file.
Ctrl + X Cut selected item.
Shift + Del Cut selected item.
Ctrl + C Copy selected item.
Ctrl + Ins Copy selected item
Ctrl + V Paste
Shift + Ins Paste
Ctrl + K Insert hyperlink for selected text
Ctrl + P Print the current page or document.
Home Goes to beginning of current line.
Ctrl + Home Goes to beginning of document.
End Goes to end of current line.
Ctrl + End Goes to end of document.
Shift + Home Highlights from current position to beginning of line.
Shift + End Highlights from current position to end of line.
Ctrl + Left arrow Moves one word to the left at a time.
Ctrl + Right arrow Moves one word to the right at a time.
Ctrl + Esc Opens the START menu
Ctrl + Shift + Esc Opens Windows Task Manager
Alt + F4 Close the currently active program
Alt + Enter Open the Properties for the selected item (file, folder, shortcut, etc.)

How to Send/Make TEXT SMS, VOICE SMS & CALLS for FREE

You can Call and Talk to any Mobile for free for over 64 Minutes Every day to any Mobile in India.
  • Site2Sms.Com is first Web Portal which offers Free TEXT SMS, VOICE SMS & VOICE CALLS.
  • You can Call and Talk to any Mobile for free for over 64 Minutes Every day to any Mobile in India. 
  • you can talk to your friends for 120 Seconds continuously.
How Does it work?
Site2SMS.Com will Call to the Mobile Number which you have entered First and as soon as it is answered, they will call to your mobile and after answering it you both will be able to talk to each other for free over 120 Seconds continuously.

How to do it:
  1. Visit Site2Sms
  2. Login or Register
  3. Click on Send sms Tab on top and choose Live Voice Call
  4. Click Dial number
  5. Dial mobile number and click call Button
  6. Click Yes connect my call
  7. First Site2sms will connect your friend’s mobile then your mobile……….You will be able to talk for 2 mins

CHOKSI AHMAD TIPS TRICKS

Sunday, 12 October 2014

તમારે મોબાઇલ પર Whatsappમાં offline થવું હોય તો?

- વોટ્સએપથી થોડા સમય માટે દૂર રહેવા આ ટ્રિક અપનાવો

- તમારા ફોનના Settings માં જઈને આટલું કરો અને ફોન રી-સ્ટાર્ટ કરી દો...


અમદાવાદ તા. 11 ઓક્ટોબર, 2014

આજનો યુઝર જેમ કમ્પ્યુટર પર ઇન્ટરનેટ દ્વારા ફેસબુકની લત લગાડીને બેઠો છે એવી જ રીતે મોબાઇલ યુઝરને વોટ્સએપનો જાણે નશો ચડ્યો છે. સ્માર્ટ ટીનેજર્સથી યંગસ્ટર્સ અને ત્યાર બાદ આજે દરેક ઉંમરના ગ્રુપમાં આ ચેટિંગ ઍપ્લિકેશન કમ્યુનિકેશનમાં રહેવાનો મૉડર્ન રસ્તો બની ગયો છે. ટ્રેડિશનલ મેસેજિંગને આરામ આપી દેતી આ ઍપ્લિકેશન ઇન્ટરનેટ દ્વારા ચાલતી હોવાથી મન્થ્લી ખર્ચ બચાવવામાં મદદરૂપ થાય છે તેમ જ મિડિયા ફાઇલ્સ (ફોટો, વિડિયો અને ઑડિયો) શૅરિંગ કરવાની ફૅસિલિટી યુઝર્સને વધુ ચસકો લગાડે છે.

તમે ક્યારેય વિચાર્યું છે કે તમારે વોટ્સએપમાં થોડા સમય માટે ઑફલાઇન થવું હોય અથવા તો થોડા સમય માટે તમને કોઈ મેસેજિસ ન મળે એવી પળો માણવી હોય તો? સીધી રીતે આ ઍપ્લિકેશનમાં આ પ્રકારનો કોઈ ઑપ્શન નથી. એથી જો ખરેખર તમારે આવી સ્થિતિની ક્યારેય પણ જરૂર પડે તો ઉંગલી ટેઢી કરવી પડે એમ એક ટ્રિક તમારી હેલ્પ કરી શકે છે.

તમે મેસેજિંગ એપનો યુઝ કરતા હશો તો તમે જોયું હશે કે તમે તમારા ફ્રેન્ડ્સ સાથે ચૅટ કરતા હો ત્યારે અથવા તો તેમનું ઓનલાઈન સ્ટેટસ જાણી શકતા હો છો. ઍપ્લિકેશનમાં ચેટિંગ બોક્સ દરમ્યાન તેના નામ નીચે ફ્રેન્ડ ઓનલાઈન છે અથવા તો છેલ્લે મેસેજ (Last seen) ક્યારે જોયો હોય એની જાણ થતી હોય છે જેના દ્વારા તમારા ફ્રેન્ડ્સ સ્ટેટસ જાણીને મેસેજ મોકલતા રહેતા હોય છે. વળી જો ફ્રેન્ડ ન મોકલે તો કોઈ ગ્રુપમાં તમે હો તો પણ વણજોઈતા મેસેજિસ મળતા રહેતા હોય છે. તો વોટ્સએપથી થોડો સમય દૂર રહેવા માટે આ ટ્રિક અપનાવો.

આ માટે તમારે તમારા ફોનના Settings માં જઈને Time and Dateમાં વર્ષને બદલીને કોઈ પણ પાછલું વર્ષ સેટ કરવાનું રહેશે. ઉદાહરણ તરીકે 2013ને બદલે 2012 કરી દો બસ, ત્યાર બાદ તમારો ફોન રી-સ્ટાર્ટ કરી દો. ફોન ઑન થયા બાદ તમને વોટ્સએપ ઍપ્લિકેશનનો તારીખ બરાબર ન હોવાનો એરર મેસેજ આવશે. બસ તો સમજી લો કે તમે થઈ ગયા ઑફલાઇન. (આમ કરવાથી તમે વોટ્સએપ પર મેસેજિસ મોકલી કે રિસીવ નહીં કરી શકો પરંતુ નોર્મલ કોલ, અન્ય ઇન્ટરનેટ ઍપ્લિકેશન, બ્રાઉઝર કામ કરશે.) જ્યારે ફરી વાર તમારે ઓનલાઈન મોડમાં જવું હોય તો ફક્ત વર્ષ ચેન્જ કરી દો એટલે ફરી તમારું વોટ્સએપ જેમ હતું એમ સ્ટાર્ટ થઈ જશે.

જો તમે iPhone યુઝર છો અને તમારે Last seen ટાઇમસ્ટેમ્પ છુપાવવો છે તો આ માટેનો ઓપ્શન ઉપલબ્ધ છે. આ માટે ઍપ્લિકેશનમાં Settings > Advanced  > Turn off 'Last Seen Timestamp' સેટ કરો.

Create a Public Folder Where Anyone Can Add Files


Dropbox and SkyDrive allow you to have “Shared Folders” where a folder is shared between all members of the group. Any member can contribute files to the shared web folder and such a thing is ideal for collaborative efforts like for sharing photos with guests after an event. People can view photos uploaded by other users as well as upload their own to the shared folder.

A limitation with these “shared folders” is that the folder owner must invite a user before he or she can add files to the folder.

OneTimeBox, a web app that went live at the recently concluded MIT hackathon (coding contest),  takes a different approach to shared folders. The app creates a disposable, public web folder where anyone can add files as long as they know the unique URL of your shared folder.

There’s no registration required and neither do you have to invite anyone as a contributor. Just share the URL of your folder with friends and they’ll have full access – including delete permissions – to the files in that folder.

OneTimeBox is built using Meteor.js and the source code can be found on Github. Internally it uses the Filepicker API which uses the Amazon S3 service for storing files in the cloud. The app is neatly designed though you cannot add file to the shared folder from your mobile devices.

How to Create Windows Partition Backup using Ghost 11.5

Ghost 11.5 is an incredible tool that one can use to create full partition backup of its C Drive or any other drive no matter, you could easily compress your whole drive with settings and software's installed on it. So now anytime you feel your window is working slow or you found some serious issues using it well you can restore it to that particular backup time using Symantec Ghost Solution Suite 11.5
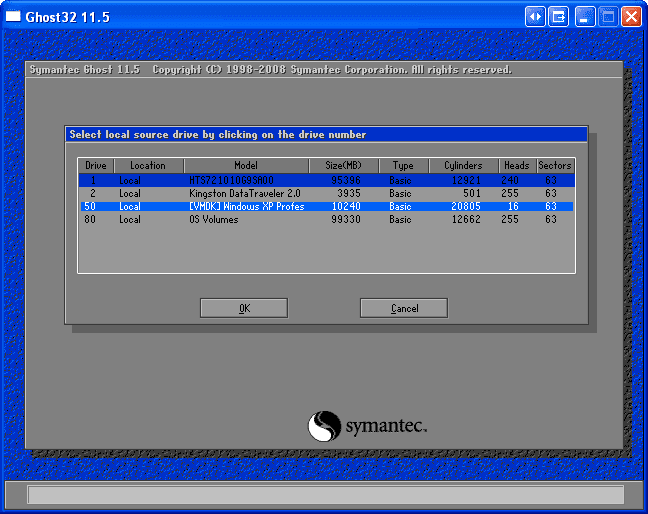
Symantec Ghost 11.5
Symantec Ghost Solution Suite is a recommended tool for any cyber café guy you usually face problems defending his computer from viruses and even cyber crime. Well the best way is to install fresh windows copy and then backup the Windows Partition right away using Ghost 11.5, now anytime you face some corruption, simply run the Symantec Ghost Solution Suite 11.5 and BOOM ! your fresh windows is back with all those software's and settings you made on it at the time of installation.

Creating backup using Symantec Ghost Solution Suite 11.5

So guys today I will be showing you how you can use Symantec Ghost Solution Suite 11.5 to create windows partition backup. Well are the steps, you can also check out the video that will help you in making this tutorial understand easily.Download Symantec_Ghost.iso
  1. Just burn this .ISO file onto any CD or you can also use USB Drive to hold this .ISO file in place of burning CD.
  2. Well I recommend that you should burn CD as it could be used by anyone on any system.
  3. Now after you have .ISO on your disk, simply boot it up. Its easy just insert the disk and then at the time of boot choose CD or DVD to boot.

  4. Now this will load and in few seconds you will be greeted with the screen.
  5. Navigate to Local > Partition > To Image.
  6. Now it will show you all the hard disk's you are having.
  7. Just choose your main hard disk, now choose the drive you want to backup.
  8. In my case I chose C: Drive.
  9. Now it will ask you to navigate to the place where you wanna place the backup file, make sure the path you choose has enough space depending on your drive size.
  10. Now as soon as you click on OK, you will see another option for the compression you want, make sure to choose "FAST" option.
  11. That's it now it will take some time depending on your drive size, so wait and then after its done just exit and restart your system.

Restoring Partition using Symantec Ghost Solution Suite 11.5

Now you have successfully created your backup, well now you would also like to know how to restore that backup in case sometime you mess up your windows system.
  1. Well boot the same disk.
  2. Now navigate to Local > Partition > From Image.
  3. That's it now choose the .GHOST File you created earlier and the partition you would like to overwrite.
  4. Now just wait and sit back and see your windows getting restored with all the settings and software's you have installed earlier.
So now you are ready to mess up your partition in case you have already created a backup using this awesome tool. Well make sure to comment below about your experience using this awesome tool.

How to Install Windows 10 from USB using this Tool

Come-on guys cheer up Windows 10 is going to be released in 2015 but its technical preview is up officially by microsoft and its available for free to download. Well the problem people usually face is that some of them do not have a CD/DVD reader or writer hence they face problems installing windows on their system.
Well today I will be showing you how you can easily install windows from USB, yes now you do not need to burn any CD/DVD but straight away you can install windows using any USB drive, the best part its GREEN and after your windows installation is completed you can format the USB drive again and then refill it up with your own personal stuff, maybe some Beatles Music would be your first choice.

How to Create Bootable USB Drive for Windows


So now lets download the tool and see all the steps that you need to take in order to install windows 10 from USB.
  1. Download Windows 10 Technical Preview .ISO Files.
  2. Now you need to download the USB/DVD Download Tool from codeplex its free.
  3. After you have downloaded the tool, simply insert your USB Drive that you want to use as your windows 10 files holder.
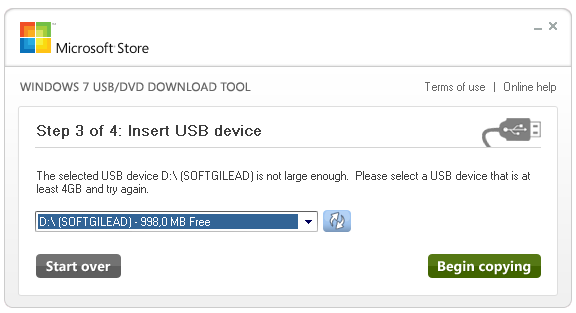
  4. Now open up the USB/DVD Download Tool and then select the USB Drive, then choose the valid .ISO File.
    usb dvd download tool
  5. Now press Begin copying and it will start creating your Bootable USB Drive.
Now you USB Drive will be ready to be used to install windows onto your system, restart your system and press the F12 or F8 key rapidly, till it shows you the boot menu, choose your USB Drive from that menu and voila, your USB will start loading all the windows files.
Enjoy installing windows 10 technical preview onto your system. Well if you face any problem do comment below. Peace!

10 Most Amazing Features of Upcoming Windows 10

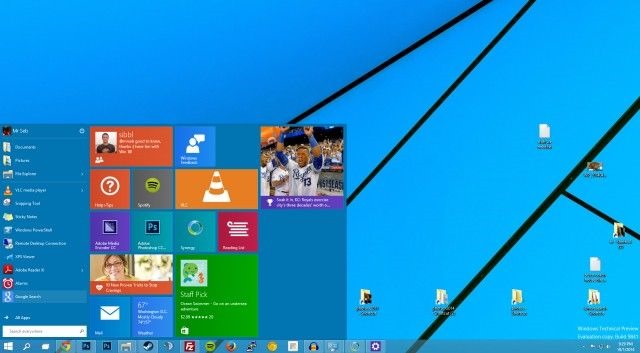
windows 10 technical preview
Microsoft has actually merely stated the most current version of Windows which has the ability to be referred to as Windows 10 and and now the technical preview version is offered for free download. This new version brings some new features and obviously improves all the older ones. So lets jump into it.

The 10 Most Exciting Features Of Windows 10

  1. New Start Menu: The brand-new beginning menu incorporates the design facets of Windows 7 with Windows 8. You have the conventional app listing in addition to the metro UI apps. You can resize these tiles on the beginning screen as well as make them fit according to your requirements. There's a me tile on the Start Menu, pinned apps and alternatives to shutdown and reboot.
  2. Multiple Desktops: Windows 10 will certainly feature numerous desktop function which was otherwise offered just utilizing 3rd party devices. You can switch over in between various desktops with several apps running in their own different locations.
  3. Snap Enhancements: The standard Windows 7 Snap View works in Windows 10 with traditional and universal apps. So you can snap both the apps together on Windows 10. There is likewise a brand-new function called "Snap Assist" at the side where you can get hold of apps from numerous desktops.
  4. New Task View on Taskbar: The brand-new taskbar has "Task view" that is the brand-new button and when you introduce job view it reveals all the apps that are presently open.
  5. All apps run in a Window: Apps from the Windows Store now open in the very same format that desktop apps do and can be resized and walked around, and have title bars on top permitting make the most of, reduce, and close with a click.
  6. New File Explorer: The brand-new file explorer now shows your current files and regularly checked out folders producing discovering files you've dealt with is simpler. This makes it simpler to manage files on Windows 10.
  7. Touch Improvements: Microsoft has actually kept some parts of touch UI from Windows 8. On a touch screen gadget, job view is bigger with buttons that are even more touch friendly. The beginning screen is likewise created in a different way on a touch gadget.
  8. New Command Prompt: an improved Command prompt and you can now paste in directory sites into command timely with Ctrl + V
  9. Universal search in Start Menu: The start menu on Windows 7 did have the search functionality and is now back with Windows 10, you can search apps, files as well as do internet search from the start menu.
  10. Corporate Ready: the enterprise ready functions and it is going to be biggest business platform ever on Windows. On this variation, venture clients will certainly have the ability to personalize the establishment.
So these were the new and most exciting features of the latest Windows 10 that will be released in 2015, so till that time you can enjoy the technical preview version and test out if you find any bugs using them.